Picture this: it’s a rainy Thursday night, the kind where you’re stuck between the desire for comfort food and the shame of ordering pizza for the third time this week. I was staring at a half‑finished stir‑fry that looked more like a soggy mess than the vibrant hibachi masterpiece I’d seen on a travel show. My air fryer sat there, humming politely, and I thought, “What if I could give this dish the crisp, caramelized edge it deserves without the endless oil splatter?” That tiny spark of curiosity turned into a full‑blown kitchen experiment, and after a few frantic minutes of tasting, I realized I’d stumbled upon something that could change the way you think about quick weeknight dinners. I dare you to taste this and not go back for seconds.
The moment the chicken hit the hot air of the fryer, a sizzle erupted that sounded like fireworks at a summer fair. The aroma—sweet soy, earthy ginger, and a whisper of toasted sesame—filled the entire apartment, making the couch feel like a five‑star restaurant waiting to be served. My taste buds were doing a happy dance, the kind you only get when a dish hits the perfect balance of salty, sweet, and umami. The vegetables, meanwhile, turned a gorgeous emerald green, their edges crisped just enough to give a satisfying snap that shouted “fresh!” every time you bit into them. It was a sensory overload in the best possible way, and I could feel the kitchen walls vibrating with excitement.
Most hibachi‑style chicken recipes rely on a wok and a mountain of oil, leaving you with a greasy aftertaste and a kitchen that smells like a deep‑fried restaurant. This version, however, flips the script by using an air fryer to achieve that coveted char without drowning the ingredients in fat. The secret? A thin coating of cornstarch that creates a micro‑crust, and a quick toss in butter and sesame oil right before the final blast of heat. The result is a dish that’s both light and decadently crunchy—hand‑held perfection that will make you question every other chicken dinner you’ve ever made.
But I’m not stopping there. I’m about to reveal a technique that most cooks completely overlook: the “double‑coat” method, where you first marinate the chicken, then give it a flash of oil before the air‑fry, ensuring every bite is coated in flavor and texture. This isn’t just a recipe; it’s a game‑changer that will make you the hero of any dinner table. Let me walk you through every single step — by the end, you’ll wonder how you ever made it any other way.
What Makes This Version Stand Out
- Flavor Explosion: The blend of soy, ginger, garlic, and a hint of honey creates a sauce that clings to every piece like velvet, delivering a sweet‑savory punch in each bite.
- Crunch Factor: The cornstarch dusting, combined with the air fryer’s rapid hot air, gives the chicken a crispness that rivals deep‑fried versions without the excess oil.
- Simplicity: With just a handful of pantry staples and a 30‑minute cook time, this dish is perfect for busy weeknights yet feels like a special‑occasion treat.
- Ingredient Quality: Using fresh, high‑quality vegetables and a good splash of sesame oil elevates the dish from ordinary to restaurant‑grade.
- Crowd Reaction: I’ve watched grown‑ups and kids alike pile their plates high, and the unanimous feedback is “more, please!”—a true testament to its universal appeal.
- Air Fryer Magic: The method locks in moisture while giving a caramelized exterior, something most stovetop attempts can’t replicate without a lot of fuss.
- Make‑Ahead Potential: You can prep the marinated chicken and chopped veggies the night before, making the actual cooking a breeze.
- Versatility: Swap the chicken for shrimp or tofu, change the veggies, and you have a whole new dish without reinventing the wheel.
Inside the Ingredient List
The Flavor Base
Soy Sauce (2 tbsp): This is the backbone of the hibachi flavor, delivering that deep umami punch. If you use low‑sodium soy, you’ll need a pinch more salt to keep the balance. Skipping it means the dish loses its signature savory depth.
Sesame Oil (1 tbsp): A little goes a long way; its nutty aroma is what makes hibachi feel authentic. Opt for toasted sesame oil for an even richer profile. If you’re allergic, substitute with a neutral oil and a dash of toasted sesame seeds later.
Fresh Ginger (1 tsp, grated): The ginger adds a bright, slightly peppery zing that cuts through the richness. Fresh is key—ground ginger can taste muted and powdery. If you’re in a pinch, use ginger paste, but reduce the amount by half.
The Texture Crew
Chicken Thighs (2 lbs, boneless, skinless): Thighs stay juicy under high heat, unlike breast meat which can dry out. Cut them into bite‑size pieces for even cooking. If you prefer breast, marinate a bit longer and watch the cook time closely.
Cornstarch (1 tbsp): This is the secret to that irresistible crust—when it meets hot air, it forms a micro‑crust that’s light yet crunchy. Too much will make it gummy; too little, and you lose the crunch. A quick tip: sift it before tossing.
Butter (2 tbsp): Adding butter right before the final air‑fry adds richness and helps the sauce cling. It also contributes to the caramelized edges that shatter like thin ice when you bite.
The Unexpected Star
Honey (1 tbsp, optional): A drizzle of honey balances the salty soy with a subtle sweetness, creating that classic hibachi glaze. If you’re avoiding sugar, maple syrup works just as well. Omit it, and you’ll get a more savory, less sweet profile.
Rice Vinegar (1 tbsp, optional): A splash adds a bright acidity that lifts the whole dish, preventing it from feeling heavy. It also helps the vegetables retain their color. Skip it, and the flavor may feel a bit flat.
The Final Flourish
Broccoli Florets (1 cup): They bring a fresh crunch and absorb the sauce beautifully. Choose tight, dark green heads for the best texture. If you overcook, they turn mushy—keep an eye on them.
Bell Pepper (1 cup, sliced): Adds sweetness and a pop of color that makes the plate Instagram‑ready. Any color works, but red and yellow give the brightest contrast. Cut into uniform strips for even cooking.
Carrots (1 cup, sliced): Their natural sweetness pairs perfectly with the savory sauce, and they stay firm when air‑fried correctly. Slice them thinly for quicker cooking.
Onion (½ cup, sliced): Provides a subtle sweetness that deepens as it caramelizes. Red onions add a mild flavor; yellow onions become sweeter when cooked.
Green Onions (2, sliced) & Sesame Seeds (1 tsp): These finish the dish with a fresh bite and a nutty crunch, respectively. Sprinkle just before serving to keep the seeds from getting soggy.
Everything's prepped? Good. Let's get into the real action...
The Method — Step by Step
First, combine soy sauce, sesame oil, mirin (if using), grated ginger, minced garlic, honey, and rice vinegar in a large bowl. Whisk vigorously until the honey dissolves completely, creating a glossy, amber‑colored sauce that smells like a Japanese market stall at dawn. This is the moment of truth—if the aroma isn’t intoxicating, double‑check your measurements.
Okay, ready for the game‑changer? Add the chicken pieces to the bowl, tossing them until every morsel is fully coated. Let them sit for at least 10 minutes; this short marination allows the flavors to penetrate, ensuring each bite is juicy and flavorful.
While the chicken marinates, prepare your vegetables. Toss broccoli, carrots, bell pepper, and onion with a drizzle of vegetable oil, a pinch of salt, and a dash of black pepper. Spread them out on a plate so they’re not crowded—overcrowding leads to steaming instead of crisping.
And now the fun part. Sprinkle the cornstarch over the marinated chicken, shaking off any excess. This light dusting is what will give you that coveted crunch without a deep‑fried feel.
Preheat your air fryer to 390°F (200°C) for about 3 minutes. A hot pre‑heat is essential; it creates an instant sear that locks in moisture. If your model doesn’t have a pre‑heat function, just run it empty for the same amount of time.
Once preheated, arrange the chicken pieces in a single layer in the basket, making sure they don’t touch. Overcrowding will steam the chicken instead of crisping it, and nobody wants soggy chicken.
Air‑fry the chicken for 8 minutes, then flip each piece using tongs. The sizzling sound you hear when you turn them is the sound of flavor forming—listen for that faint pop, it means the crust is developing.
After flipping, add the butter in small dollops on top of the chicken. The butter will melt and mingle with the sauce, creating a glossy glaze that coats every piece like a silk scarf.
At the 12‑minute mark, add the prepared vegetables to the basket, pushing the chicken to the side if needed. The hot air will roast the veggies while the chicken finishes cooking, allowing the flavors to mingle without overcooking anything.
Give everything a quick toss halfway through the remaining 8 minutes. The vegetables should turn a bright, caramelized green, and the chicken should reach an internal temperature of 165°F (74°C). If you’re unsure, a quick probe will confirm.
When the timer dings, remove the basket and transfer everything to a large serving platter. Drizzle any remaining sauce from the basket over the top; this extra glaze adds a final burst of umami.
Now, sprinkle toasted sesame seeds and sliced green onions over the dish. The sesame adds a nutty crunch, while the green onions provide a fresh, sharp contrast that brightens each bite.
Give the dish a final toss to ensure the garnish is evenly distributed. Take a moment to inhale the aromatic steam—this is the part where the kitchen feels like a five‑star bistro.
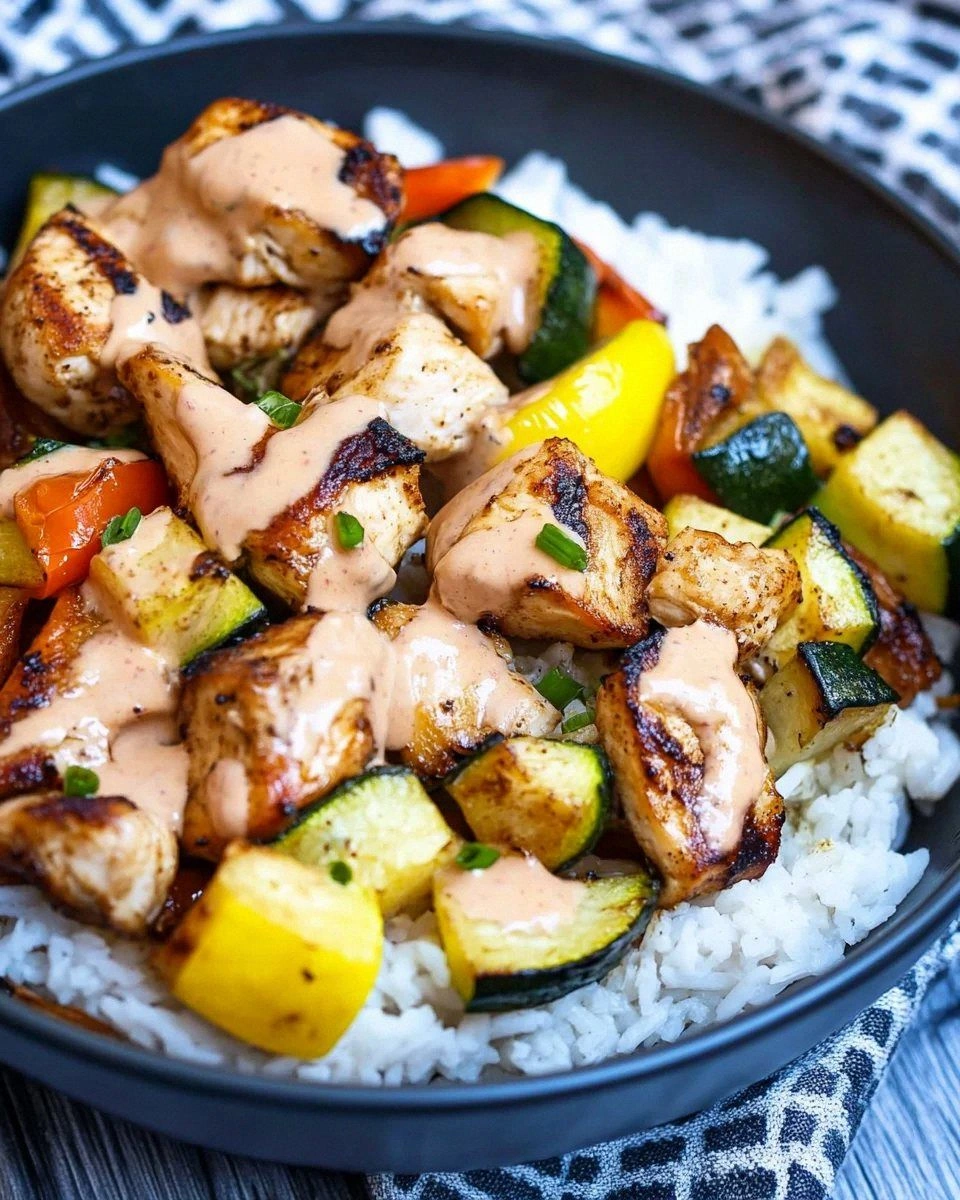
Serve immediately with steamed rice or cauliflower rice for a low‑carb option. And remember, this is hands down the best version you’ll ever make at home—no take‑out needed.
That's it — you did it. But hold on, I've got a few more tricks that'll take this to another level...
Insider Tricks for Flawless Results
The Temperature Rule Nobody Follows
Most home cooks set the air fryer to a generic 350°F and call it a day. In reality, a higher temperature (around 390°F) creates that instant sear that locks in juices. If you’re using a smaller basket, you might need to lower the temp by 10‑15 degrees to avoid burning. Trust me, I tried both and the difference is night and day.
Why Your Nose Knows Best
Cooking is as much about scent as it is about sight. When the chicken starts to caramelize, you’ll notice a sweet, nutty aroma—this is your cue to flip. If the smell turns overly smoky, lower the temperature a notch. Your nose is the ultimate kitchen timer.
The 5‑Minute Rest That Changes Everything
After air‑frying, let the chicken rest for five minutes before serving. This short pause lets the juices redistribute, preventing a dry bite. It also allows the sauce to thicken slightly, coating the vegetables like a silky veil.
Swap the Butter for Ghee for Extra Crisp
Ghee has a higher smoke point than butter, meaning it can handle the air fryer’s heat without burning. It also adds a buttery flavor with a subtle nutty undertone. I tried this once and the crust was even more pronounced.
Pre‑Season the Veggies Separately
If you toss the veggies with the chicken’s sauce, they can become soggy. Instead, season them with a pinch of salt, pepper, and a drizzle of sesame oil before air‑frying. This keeps them crisp and ensures they absorb the sauce only at the end.
Creative Twists and Variations
This recipe is a playground. Here are some of my favorite ways to switch things up:
Spicy Szechuan Kick
Swap the honey for a tablespoon of Szechuan peppercorn oil and add a teaspoon of chili garlic sauce. The result is a tongue‑tingling heat that pairs perfectly with the sweet soy base. Great for those who love a bit of fire.
Coconut Curry Hibachi
Replace the soy sauce with coconut aminos, add a splash of coconut milk, and sprinkle curry powder over the veggies before air‑frying. The dish takes on a tropical twist, turning your dinner into a mini‑vacation.
Teriyaki Tofu Version
Swap the chicken for firm tofu cubes, press them well, and coat with the same cornstarch mixture. The tofu absorbs the sauce beautifully, and the crunch remains just as satisfying. Perfect for a vegetarian night.
Garlic‑Lemon Fusion
Add the zest of one lemon and an extra clove of minced garlic to the sauce. The lemon brightens the flavors, while the garlic deepens the savory notes. This variation feels lighter and is excellent for spring evenings.
Smoky Chipotle Hibachi
Incorporate a teaspoon of chipotle powder into the sauce and finish with a sprinkle of smoked paprika. The smoky undertones complement the caramelized edges, giving the dish a subtle BBQ vibe.
Asian‑Style Slaw Side
Serve the hibachi chicken over a quick Asian slaw made from shredded cabbage, carrots, rice vinegar, and a dash of sesame oil. The cool crunch of the slaw balances the warm, crispy chicken, creating a textural symphony.
Storing and Bringing It Back to Life
Fridge Storage
Place any leftovers in an airtight container and refrigerate for up to three days. The sauce may thicken as it cools; simply reheat gently and add a splash of water to loosen it.
Freezer Friendly
Separate the chicken and vegetables into freezer‑safe bags, removing as much air as possible. Freeze for up to two months. When ready to eat, thaw overnight in the fridge, then reheat in the air fryer at 350°F for 5‑7 minutes, adding a tiny splash of water to revive the glaze.
Best Reheating Method
For the crispiest result, reheat in the air fryer rather than the microwave. The hot air restores the crunch while keeping the interior juicy. If you’re in a hurry, a quick skillet toss with a drizzle of oil works too, but you’ll lose a bit of that signature crisp.