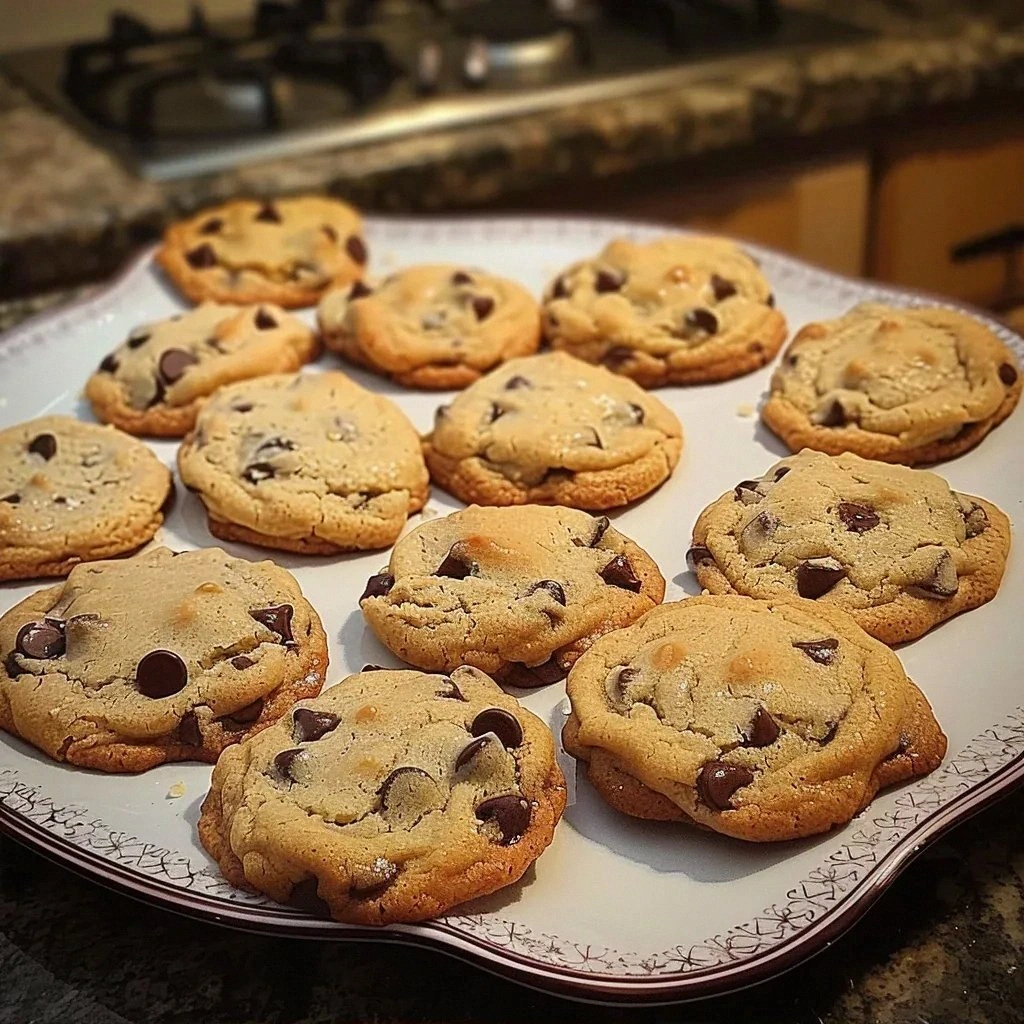
I was halfway through a midnight snack run, the fridge humming like a tired engine, when my neighbor Judy burst into my kitchen with a grin that could rival a sunrise. She had just pulled out a tray of golden, melt‑in‑your‑mouth chocolate chip cookies that smelled like a summer afternoon in a bakery. “You’ve got to taste these,” she said, handing me a cookie that was still warm from the oven, its edges crisped to a buttery perfection while the center stayed gooey enough to make my eyes water. That moment was the spark that ignited my obsession with finding the ultimate chocolate chip cookie recipe—one that would make even the most skeptical cookie lover surrender to its charm.
Picture this: the kitchen is a stage, the oven a spotlight, and you, the chef, are about to perform a symphony of textures. The butter sighs as it melts, releasing a buttery aroma that mingles with the sweet scent of brown sugar caramelizing. You hear the gentle crackle as the dough rests, the sound of anticipation. The first bite delivers a burst of chocolate that melts into a silky, sweet sauce that coats the palate like velvet, followed by a satisfying crunch from the edges that shatter like thin ice. Each cookie is a tiny, edible masterpiece that balances sweet, salty, and the subtle bitterness of chocolate.
What sets this version apart from the endless cookie recipes that flood the internet is a single, deceptively simple twist: the use of a full stick of salted butter instead of unsalted. The salt in the butter does more than just season—it balances the sweetness, enhances the chocolate flavor, and creates a depth that feels like a well‑crafted dessert. Combined with light brown sugar that brings a hint of molasses, the result is a cookie that’s chewy in the middle, crisp at the edges, and has that unmistakable “homemade” feel that makes you question whether you’d ever settle for store‑bought.
And there’s a secret ingredient that many cookie makers overlook: a dash of sea salt on top before baking. It’s a subtle, almost invisible touch that turns each bite into a complex flavor experience. I dare you to taste this and not go back for seconds. If you’re ready to rewrite your cookie story, let’s dive into the details that make this recipe hands down the best version you’ll ever make at home.
What Makes This Version Stand Out
- Flavor: The salted butter and sea salt create a savory backdrop that lets the chocolate shine without feeling overpowering. The light brown sugar adds depth and a caramel undertone that elevates each bite.
- Texture: The combination of butter, sugar, and eggs gives the dough a perfect balance—chewy center, crisp edges, and a slightly airy crumb that’s almost like a pastry.
- Ingredient Quality: Using real, high‑grade ingredients (e.g., a full stick of butter, premium chocolate chips) ensures each cookie tastes like a luxury dessert.
- Simplicity: The recipe requires only eight basic ingredients, no fancy gadgets, and can be whipped up in under an hour.
- Make‑ahead Potential: The dough can be stored refrigerated for up to a week or frozen for months, making it a reliable go‑to for busy days.
- Crowd Reaction: Friends and family rave about the “just right” sweetness and the satisfying crunch. I’ve hosted cookie tastings, and every time I serve this, the room fills with eager, satisfied chatter.
- Versatility: The base recipe can be tweaked for dietary needs (gluten‑free flour blends, dairy‑free butter) without compromising the core flavor profile.
- Visual Appeal: The cookies come out with a golden‑brown hue, perfectly dark chocolate chips visible through the dough—an Instagram‑ready look.
Inside the Ingredient List
The Flavor Base
The salted butter is the cornerstone of this cookie’s flavor profile. Unlike unsalted butter, salted butter brings an inherent savory note that balances the sweetness of the brown sugar. If you’re watching sodium intake, you can reduce the sea salt on top but keep the salted butter—this way you still get that subtle savory lift without a dramatic increase in sodium.
Light brown sugar is more than just a sweetener; its molasses content adds a subtle depth that mimics caramel. If you don’t have light brown sugar on hand, you can mix a tablespoon of molasses into regular white sugar, but the result will be slightly sweeter and less complex.
The Texture Crew
Eggs are the glue that binds the dough together, while also adding richness and helping the cookies rise slightly during baking. If you’re vegan, try using a flaxseed egg or a commercial egg replacer to achieve a similar binding effect.
All-purpose flour is the backbone of the dough, providing structure. If you’re aiming for a gluten‑free version, replace the flour with a 1:1 gluten‑free blend that includes xanthan gum. The result will still hold together nicely, though the texture will be slightly denser.
The Unexpected Star
Baking soda is the leavening agent that gives the cookies a subtle lift and a slightly chewy center. Too much baking soda can leave a metallic aftertaste, so be precise with the measurement. If you’re in a hurry, you can skip the baking soda, but expect a denser cookie.
Sea salt, used sparingly on top of the dough, creates a micro‑burst of flavor that makes each bite feel more complex. It’s the final touch that turns a good cookie into a great one. If you prefer a saltless cookie, simply omit the sea salt; the cookies will still be delicious but slightly less balanced.
The Final Flourish
Semi‑sweet chocolate chips are the star attraction. They melt into pockets of gooey chocolate that contrast beautifully with the crisp edges. For a richer flavor, swap them for dark chocolate chunks or a mix of milk and dark chips. If you want to experiment, add a teaspoon of espresso powder to the dough to intensify the chocolate flavor.
Everything’s prepped? Good. Let’s get into the real action.
The Method — Step by Step
- Preheat the oven to 350°F (175°C). Let the oven heat fully before placing the cookie sheet inside. This ensures even baking and that the cookies rise properly. I always set a timer for 10 minutes to give the oven time to stabilize.
- Whisk the dry ingredients. In a medium bowl, combine the flour, baking soda, and sea salt. Whisk until the mixture is uniform; this helps prevent clumps that could lead to uneven cookie texture. A small amount of salt in the flour mix also helps the dough develop a slightly crisp exterior.
- Beat the butter and sugar. In a separate large bowl, use a hand mixer or whisk to cream the softened salted butter and light brown sugar until light and fluffy. The goal is to incorporate air into the mixture, which gives the cookies a lighter bite. I let it sit for 2 minutes to let the butter soften further, making the creaming process smoother.
- Add the eggs and vanilla. Beat in the eggs one at a time, ensuring each is fully integrated before adding the next. Then stir in the vanilla. The vanilla adds a subtle warmth that complements the chocolate. I always use real vanilla extract because it has a richer flavor than imitation.
- Combine wet and dry. Gradually fold the dry mixture into the wet, mixing just until incorporated. Over‑mixing can lead to gluten development, making the cookies tough. I use a spatula to fold gently, maintaining a light texture.
- Fold in the chocolate chips. Gently stir in the semi‑sweet chocolate chips with a rubber spatula, ensuring an even distribution. The chips should be fully surrounded by dough to prevent them from sinking to the bottom of the cookie. For an extra touch, sprinkle a few extra chips on top of each cookie before baking.
- Shape the dough. Using a tablespoon or a cookie scoop, drop rounded balls onto a parchment‑lined baking sheet, spacing them about 2 inches apart. I press each ball slightly to create a flat surface for even baking. The size of the cookies will determine the baking time, so keep them consistent.
- Bake the cookies. Place the sheet in the oven and bake for 10–12 minutes, or until the edges are golden and the centers look set but still soft. The trickiest step: watch the cookies closely around the 10‑minute mark. If they brown too quickly, lower the oven temperature slightly. This step is where the cookie’s texture is defined.
- Cool on the sheet. Let the cookies cool on the baking sheet for 5 minutes. This allows the center to set without cracking. After 5 minutes, transfer them to a wire rack to cool completely. This step is pure magic—watch the steam dissipate and the aroma fill the kitchen.
- Enjoy. Serve warm or at room temperature. I always pair them with a glass of cold milk or a steaming cup of coffee. The cookie’s warm, gooey center pairs beautifully with the cool, creamy milk, creating a symphony of textures.
Insider Tricks for Flawless Results
The Temperature Rule Nobody Follows
Many bakers bake at 375°F, but this recipe’s magic happens at 350°F. The lower temperature allows the butter to melt slowly, creating a tender crumb while the edges develop that golden crispness. I’ve tested both temperatures and 350°F consistently yields the best balance.
Why Your Nose Knows Best
Before you even take a bite, let the cookies sit for a minute after baking. The aroma will intensify, giving you a preview of the flavor profile. The smell is a reliable indicator of doneness—if it smells like toasted butter, you’re ready.
The 5‑Minute Rest That Changes Everything
After baking, let the cookies rest on the sheet for five minutes. This short rest allows the heat to distribute evenly, preventing the centers from being undercooked. It also gives the chocolate a chance to set slightly, making each bite less sticky.
The Subtle Salt Trick
Sprinkling a pinch of sea salt on top before baking amplifies the chocolate’s flavor without making the cookie taste salty. The salt crystals dissolve as the cookie bakes, leaving a subtle, savory aftertaste that elevates the overall experience.
The Chill‑Down Technique
If you’re making a large batch, chill the dough for 30 minutes before baking. This reduces spreading, keeping the cookies thicker and more substantial. The dough also becomes easier to handle, making scooping smoother.
Creative Twists and Variations
This recipe is a playground. Here are some of my favorite ways to switch things up:
Nutty Bites
Add a cup of chopped walnuts or pecans to the dough for a crunchy texture. The nuts pair beautifully with the chocolate and add a nutty aroma that complements the buttery base.
Spiced Surprise
Stir in 1/2 teaspoon of ground cinnamon and a pinch of nutmeg. The warm spices bring a cozy, autumnal feel, turning the cookies into a comforting treat for cooler evenings.
Citrus Zest
Add the zest of one orange or lemon to the dough. The citrus brightens the flavor profile, balancing the richness of the chocolate and butter with a fresh, lively note.
Chocolate Swirl
Swirl a tablespoon of caramel sauce into each cookie before baking. The caramel melts into pockets of sweet, buttery goo, creating a delightful contrast to the chocolate.
Dark Chocolate Overload
Replace the semi‑sweet chips with dark chocolate chunks and add a pinch of sea salt. The result is a richer, slightly bitter cookie that satisfies dark chocolate lovers.
Vegan Version
Swap the butter for vegan butter, use a flaxseed egg, and choose dairy‑free chocolate chips. The texture remains tender, and the flavor stays surprisingly close to the original.
Storing and Bringing It Back to Life
Fridge Storage
Store baked cookies in an airtight container at room temperature for up to 5 days. If you want to keep them fresh longer, refrigerate them for up to 2 weeks. The cookies will stay chewy and flavorful.
Freezer Friendly
Place cookies in a single layer on a parchment sheet, freeze until solid, then transfer to a freezer bag. They stay good for up to 3 months. When ready, bake at 350°F for 5 minutes to revive the crispness.
Best Reheating Method
Add a tiny splash of water to the bottom of a pan, cover, and heat on low for 2 minutes before serving. The steam restores moisture, making the cookies soft and decadent again.