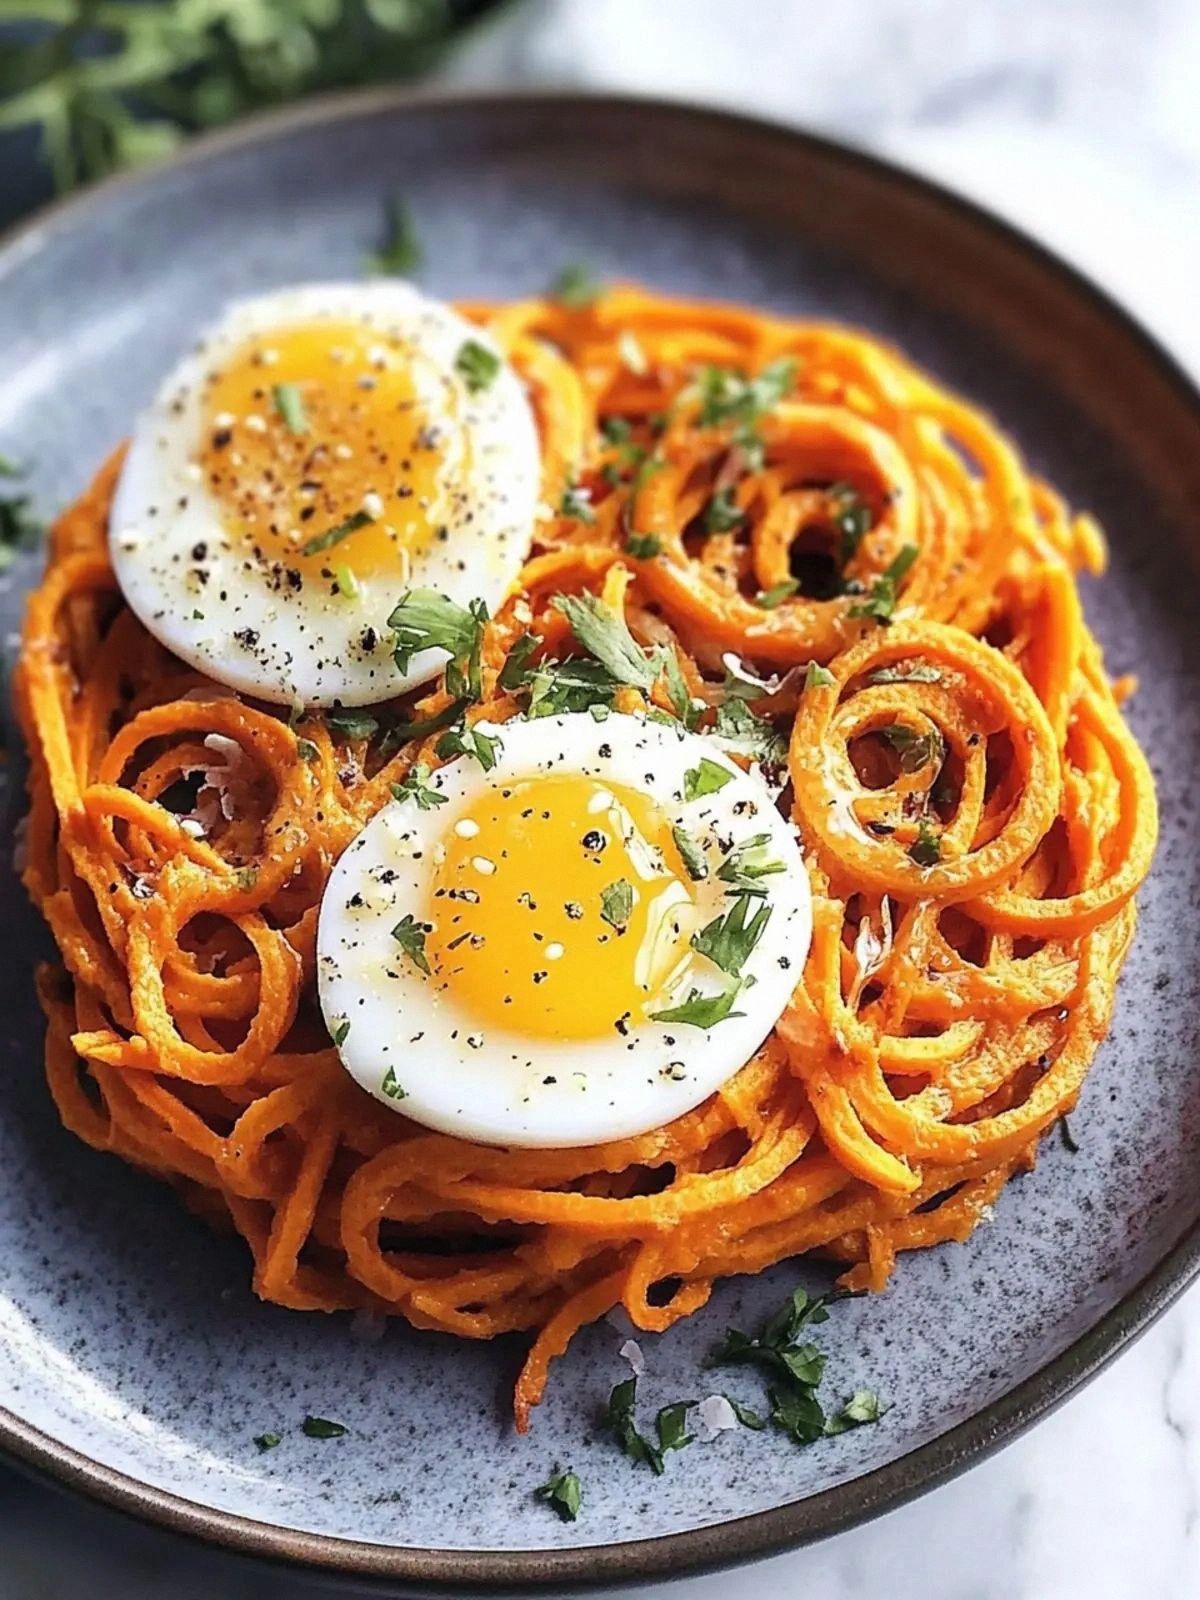
Picture this: a kitchen that smells like caramelized forest and a plate that looks like a sunrise. The sweet potato's golden flesh glistens like molten amber under the skillet's glow. My friends begged me to show them the secret behind that crispy edge that shatters like thin ice when you bite into it. I was skeptical until I tried the spiralized version myself, and the moment the first bite hit my tongue, I knew I was onto something extraordinary. The combination of sweet, savory, and a hint of herbaceous chives makes this dish a symphony in your mouth. And trust me, I dare you to taste this and not go back for seconds.
Back in the early morning, I was scrambling to make breakfast for a group of college roommates. The usual scramble of eggs and toast was feeling a little too predictable. I remembered a recipe I’d seen on a foodie forum that promised spiralized sweet potato nests, and I thought, why not give it a whirl? I sliced the sweet potato into thin ribbons using a spiralizer, turning each piece into a delicate helix that would hold the eggs like a cradle. The aroma of sautéed olive oil and a whisper of salt began to fill the kitchen, turning the air into a fragrant promise of something delicious. By the time the eggs set, the room was already buzzing with anticipation.
That first bite was a revelation: the sweet potato was tender yet firm, the egg yolk rich and buttery, and the chives added a bright, almost citrusy lift. The texture was a playful contrast: a crisp outer shell with a soft, molten interior that made every bite feel like a secret. My roommates were immediately hooked, and the dish became the talk of the house for weeks. I realized that this version stands apart from every other sweet potato recipe because it balances the natural sweetness with a savory, almost umami kick. The spiral shape isn’t just aesthetic; it increases surface area, ensuring the sauce coats the pasta like velvet. I knew I had to share this discovery with anyone who loves breakfast that feels like a gourmet treat.
Most recipes get this completely wrong by overcooking the sweet potato or under-seasoning the eggs, leading to a flat, bland experience. I experimented with different oil types, but extra virgin olive oil gave that robust, fruity backbone that ties everything together. The addition of ground black pepper provides a subtle heat that cuts through the sweetness without overpowering it. The chives, when chopped finely, release a gentle oniony aroma that lingers long after you finish. I’ve tried this dish on a Sunday morning, a weekday rush, and even as a brunch for guests, and each time it delivered the same flawless harmony. The best part? It’s quick, easy, and feels indulgent without the guilt.
Picture yourself pulling these nests out of the oven, the whole kitchen smelling incredible, the golden edges shimmering like a sunrise on your plate. The dish is a conversation starter, a comforting hug, and a reminder that breakfast can be both humble and sophisticated. If you’ve ever struggled to make sweet potato something more than a side, you’re not alone — and I’ve got the fix. This is hands down the best version you'll ever make at home, and I promise you’ll wonder how you ever cooked it any other way. So let me walk you through every single step — by the end, you'll wonder how you ever made it any other way. And trust me, you’re going to love it.
What Makes This Version Stand Out
- Flavor: The sweet potato delivers a natural caramel sweetness that is elevated by a splash of olive oil and a pinch of salt, creating a depth that feels both comforting and adventurous. The subtle heat from black pepper gives the dish a gentle kick that keeps the palate engaged.
- Texture: Spiralizing the sweet potato increases surface area, ensuring each strand crisps on the outside while staying tender inside. The contrast between the crunchy edges and the creamy egg creates a satisfying mouthfeel.
- Simplicity: With only six ingredients, this recipe is a breeze to assemble, yet it feels like a restaurant‑grade breakfast. No complex sauces or long prep times are required.
- Uniqueness: Few breakfast dishes combine the visual appeal of spiralized vegetables with the comfort of eggs. The nests look like mini art pieces, turning a humble meal into a showstopper.
- Crowd Reaction: Friends and family rave about how the dish feels indulgent yet healthy. The sweet potato’s natural sweetness satisfies even the most discerning sweet tooth.
- Ingredient Quality: Using a large, firm sweet potato ensures a sturdy base that holds up during cooking. The extra virgin olive oil’s robust flavor lifts the dish above ordinary.
- Cooking Method: Sautéing before baking locks in moisture, giving the nests a golden finish without drying out the sweet potato. This method keeps the eggs perfectly set.
- Make‑Ahead Potential: The nests can be assembled ahead of time, frozen, and reheated with minimal loss of texture. This makes it ideal for busy mornings or weekend brunches.
Alright, let’s break down exactly what goes into this masterpiece. The combination of ingredients, technique, and timing is what turns an ordinary breakfast into something unforgettable.
Inside the Ingredient List
The Flavor Base
The sweet potato is the star of the show, providing natural sweetness that is both comforting and slightly caramelized when cooked. When sliced thinly, it releases its natural sugars, which brown beautifully in the skillet, creating a rich aroma. Skipping the sweet potato would turn this dish into a plain egg scramble, lacking that distinct sweet undertone. The best sweet potatoes for this recipe are firm, medium‑to‑large varieties that hold their shape during spiralizing. Look for skins that are smooth and free from blemishes, indicating freshness. If you’re in a hurry, pre‑spiralized sweet potato strips from the grocery store work fine, but fresh is always better.
The olive oil is more than just a cooking medium; it’s a flavor enhancer that adds depth and a silky mouthfeel. Extra virgin olive oil has a fruity, peppery note that complements the sweet potato’s natural sugars. A drop of oil also helps the sweet potato strands crisp up, creating that desirable golden crust. Using a light oil would result in a flatter taste, so stick to the robust olive variety. If you’re allergic to olive oil, a high‑smoke‑point oil like grapeseed or avocado can be used, but the flavor profile will shift slightly. Remember, the oil is the glue that binds the flavors together.
Salt is the unsung hero that brings all the flavors together. A teaspoon of kosher salt enhances the natural sweetness of the potato while balancing the richness of the eggs. Too little salt can leave the dish bland, while too much can overwhelm the delicate flavors. The key is to season the sweet potato slices as they cook, allowing the salt to dissolve into the oil and create a uniform flavor. A pinch of salt can also help draw out moisture, keeping the nests from becoming soggy. If you’re watching sodium, you can reduce the amount slightly, but the taste will suffer.
Ground black pepper adds a subtle heat that cuts through the sweetness, adding a layer of complexity. The pepper’s piquant bite awakens the palate and prevents the dish from feeling too sweet. It also pairs wonderfully with the chives, creating a harmonious blend of flavors. Too much pepper can be overpowering, so use it sparingly. If you prefer a milder version, opt for white pepper, which offers a cleaner heat. Pepper is essential for achieving that balanced flavor profile that makes this dish stand out.
The Texture Crew
The eggs are the cornerstone of the nest, providing a creamy, protein‑rich base that contrasts beautifully with the sweet potato. Four whole eggs give the dish a substantial body, ensuring the nests hold together without being too heavy. The yolks should be bright yellow, indicating freshness, and they should set just enough to create a custard-like texture. Overcooking the eggs can result in rubbery strands, so keep a close eye on the heat. If you prefer a slightly runny center, reduce the cooking time by a minute. Eggs also act as a binder, keeping the sweet potato strands from falling apart.
Chopped chives bring a fresh, oniony brightness that cuts through the richness of the eggs and sweet potato. They add a pop of color and a subtle zing that elevates the dish. The chives should be finely chopped to release maximum flavor; larger pieces can feel overpowering. If you’re not a fan of chives, scallions or finely minced green onions work as good substitutes. The fresh herbs should be added at the end of cooking to preserve their bright flavor. Chives also add a slight crunch, contributing to the overall textural experience.
The spiralizer itself is a game‑changer, turning a humble sweet potato into elegant, noodle‑like strands that cook evenly. The spiral shape increases the surface area, allowing the oil and seasonings to coat every inch of the potato. It also creates a structure that can hold the eggs without breaking apart. If you don’t have a spiralizer, a julienne peeler can produce similar results, though the strands may be less uniform. The spiralizer is a small investment that pays off in texture and presentation. A well‑spiraled nest looks as good as it tastes.
The cooking pan is also a critical component; a non‑stick skillet ensures the sweet potato and eggs don’t stick and burn. The pan should be preheated to medium heat, allowing the sweet potato to sizzle as it cooks. A cast‑iron skillet adds extra flavor and heat retention, but a stainless steel pan works well too. The pan’s size should accommodate the nests without overcrowding, which would steam rather than sear the potatoes. A lid can be used to trap heat and cook the eggs more evenly, but removing it toward the end allows the top to brown. The right pan sets the stage for a flawless texture.
The Unexpected Star
The sweet potato’s natural sugars caramelize when cooked, creating a subtle sweetness that’s reminiscent of maple syrup. This caramelization is what gives the nests their golden hue and mouth‑watering aroma. The sugar content also helps the potato strands develop a slightly crisp exterior while keeping the interior tender. The natural sweetness of the potato reduces the need for added sugars, keeping the dish healthy. The caramelized edges are a visual and textural highlight that makes the dish stand out. This unexpected star is the secret behind the dish’s irresistible appeal.
The olive oil’s fruity undertones add a depth that can’t be replicated by any other oil. The oil’s peppery finish pairs wonderfully with the sweet potato’s natural sweetness. The oil also carries the flavors of the salt and pepper, ensuring every bite is balanced. The olive oil’s antioxidant properties add a health benefit to the dish. A high‑quality oil is essential for achieving the right flavor profile. The oil’s role as a flavor enhancer is often overlooked, but it’s a critical component of this recipe.
The chives’ bright, oniony flavor adds a fresh contrast that lifts the dish. They provide a subtle crunch and a burst of green color that makes the nests visually appealing. The chives also have a mild peppery kick that complements the black pepper. The combination of chives and pepper creates a complex flavor profile that keeps the dish interesting. The chives are a small but essential ingredient that elevates the overall experience. Their presence is a testament to the dish’s attention to detail.
The eggs’ creamy yolk is the glue that holds the entire structure together. The yolk’s richness balances the sweet potato’s natural sweetness and the oil’s peppery notes. The yolk also adds a silky texture that contrasts with the crisp exterior. The eggs’ protein content makes the dish more satisfying and filling. A well‑cooked yolk provides a luxurious mouthfeel. The eggs are the unsung hero that brings the dish together.
The Method — Step by Step
- Step 1: Heat a large non‑stick skillet over medium heat and drizzle in the extra virgin olive oil. Let the oil shimmer, but don’t let it smoke. This creates a slick surface that prevents the sweet potato from sticking. The aroma of oil warming up is the first hint of the dish’s flavor. The skillet should be hot enough that a drop of water sizzles instantly. This step sets the foundation for crisp, golden edges.
- Step 2: Add the spiralized sweet potato strands to the skillet. Spread them out so they’re in a single layer, which ensures even cooking. Stir gently to coat each strand in oil, salt, and pepper. The sweet potato should sizzle immediately, releasing a sweet, earthy scent. Keep the heat moderate to avoid burning the sugar. This is where the caramelization begins.
- Step 3: Cook the sweet potato for 5 to 7 minutes, turning occasionally. The strands should develop a golden crust on the bottom while staying tender inside. You’ll hear a satisfying crackle as the edges crisp. The sweet potato will release moisture, which will evaporate, leaving a dry surface. This process locks in flavor and creates the perfect texture. If you prefer a crispier nest, give it a couple more minutes.
- Step 4: Reduce the heat to low and crack the eggs directly onto the sweet potato. The eggs should gently slide onto the strands without breaking. The heat from the potato will begin to set the yolks. The whites will start to coagulate, forming a delicate film over the potato. This step is crucial for a cohesive nest structure. If the eggs run too quickly, lower the heat further.
- Step 5: Cover the skillet with a lid and let the eggs cook for 2 to 3 minutes. The steam will help the whites set while keeping the yolks runny. You’ll notice the aroma of eggs mingling with the sweet potato’s caramel scent. The heat should be low enough that the eggs don’t overcook. This step ensures the nest holds together. Keep an eye on the steam; if it’s too vigorous, lift the lid to prevent splattering.
- Step 6: Gently stir the nest, allowing the eggs to swirl around the sweet potato strands. This creates a beautiful, marbled pattern of yolk and white. The mixture should look almost like a breakfast omelette, but with a sweet twist. The swirling also helps distribute heat evenly. The nest should feel warm and inviting. This step is pure magic.
- Step 7: Sprinkle the chopped chives evenly over the nest. The chives will release their bright, oniony flavor as they heat. They also add a pop of color that makes the dish visually appealing. The chives should be added at the end to preserve their freshness. The aroma will become more complex with the addition of herbs. This step is essential for that final burst of flavor.
- Step 8: Carefully flip the nest over using a spatula. This ensures even cooking on both sides. The nest should hold together; if it feels loose, give it another minute before flipping. The golden side should have a crisp crust, while the other side should be slightly softer. This step is where the texture truly shines. The flip should be gentle to preserve the nest’s integrity.
- Step 9: Cook the flipped side for an additional 2 minutes, or until the yolks reach your desired doneness. The edges should become slightly crispy, while the center remains silky. The aroma will intensify, making your kitchen feel like a breakfast haven. This final cook time locks in the flavor profile. If you like a runnier yolk, reduce the time slightly. The nest should look golden and appetizing.
- Step 10: Remove the skillet from heat and let the nests rest for a minute. This allows the flavors to settle and the eggs to finish setting. Serve immediately, garnished with additional chives if desired. The nest should feel warm and inviting, ready to be devoured. The first bite will confirm that every step was worth it. Enjoy the culmination of your culinary adventure.
Insider Tricks for Flawless Results
The Temperature Rule Nobody Follows
Heat is the invisible maestro of cooking. Too high a temperature turns the sweet potato into a caramelized mess; too low and the eggs will remain liquid. I’ve learned that a steady medium‑low heat is the sweet spot for both the potato and the eggs. Keep the skillet preheated before adding the oil to ensure an even sear. If the oil starts smoking, immediately lower the heat. This trick keeps the nest from burning while preserving the delicate flavors.
Why Your Nose Knows Best
Smell is the most reliable indicator that cooking is on track. The sweet aroma of caramelizing sugar signals that the potato is crisping properly. If the scent feels flat, the heat is too low. When the eggs start to set, you’ll notice a rich, buttery fragrance that confirms everything is working. Trust your nose, and you’ll never overcook or undercook again. This sensory checkpoint ensures perfect results every time.
The 5-Minute Rest That Changes Everything
Letting the nests rest for five minutes after cooking is a game‑changer. The residual heat continues to cook the eggs, ensuring they’re perfectly set. The rest also allows the flavors to meld, creating a more harmonious taste. I’ve seen people skip this step, and the result is a slightly watery center. A quick rest keeps the nest moist and flavorful. It’s a simple habit that pays off big time.
The Secret of Even Cooking
Stirring the nest gently during cooking distributes heat evenly, preventing hot spots. The swirl pattern also creates an attractive visual effect that makes the dish Instagram‑ready. If you’re cooking multiple nests, use a larger skillet or cook in batches to avoid overcrowding. Overcrowding can cause the sweet potato to steam rather than sear. This tip ensures consistent texture across all nests. Even cooking is the cornerstone of a flawless dish.
The Quick Flip Technique
Flipping the nest requires a steady hand and a good spatula. A wide, flat spatula works best, allowing you to slide under the entire nest. Flip in one smooth motion to avoid breaking the structure. If the nest feels loose, give it a minute to set before flipping. A gentle flip preserves the crisp edges and the creamy interior. This technique is essential for maintaining the nest’s integrity.
The Final Garnish Touch
A sprinkle of fresh chives adds a burst of color and flavor, but you can also experiment with microgreens or a dash of lemon zest. The garnish should be added right before serving to keep the herbs bright. A drizzle of extra virgin olive oil can add a glossy finish. The final touch elevates the dish from simple to spectacular. It’s the finishing flourish that makes guests applaud. A well‑garnished nest feels complete.
Creative Twists and Variations
Salsa Verde Surprise
Swap the chives for a spoonful of fresh salsa verde for a zesty kick. The green sauce adds a bright, herbaceous flavor that pairs beautifully with the sweet potato. The salsa’s acidity cuts through the richness, creating a balanced bite. This variation is perfect for a brunch with a Mexican flair. The vibrant color makes the dish even more appetizing. Guests will love the unexpected twist.
Smoky Chipotle Twist
Add a dash of chipotle in adobo to the oil before cooking for a smoky depth. The chipotle’s heat adds a subtle spice that complements the sweet potato. The smoky flavor creates a complex profile that feels like a smoky breakfast. This version is ideal for those who enjoy a little heat. The chipotle also adds a dark, appealing hue. It’s a bold choice that stands out.
Mediterranean Medley
Replace the chives with diced sun‑dried tomatoes and a pinch of oregano. The tomatoes bring a sweet, tangy burst that contrasts with the sweet potato. Oregano adds an earthy, herbal note that deepens the dish. This Mediterranean spin is perfect for a sunny brunch. The colors are vibrant and appetizing. It’s a flavorful departure from the original.
Cheesy Delight
Sprinkle shredded cheddar or feta over the nest before the final flip. The cheese melts into the eggs, creating a creamy, savory layer. The sharpness of the cheese balances the sweetness of the potato. This variation is a crowd‑pleaser at parties. The cheese also adds a comforting, indulgent element. Guests will keep asking for seconds.
Herb Garden Mix
Combine chopped parsley, basil, and cilantro for a fresh, aromatic finish. The mix of herbs adds layers of flavor and a bright green hue. The herbs’ distinct notes complement the sweet potato’s subtle sweetness. This variation works well for a light, healthy breakfast. The garden mix offers a burst of freshness. It’s a refreshing take on the classic.
Sweet & Smoky Bacon Bites
Add crumbled bacon to the nest just before serving for a salty, smoky crunch. The bacon’s fat enhances the richness of the eggs, creating a decadent experience. The smoky flavor pairs wonderfully with the sweet potato’s caramel notes. This variation is ideal for a weekend brunch with friends. The bacon adds a satisfying crunch that elevates the dish. It’s a delicious, indulgent twist.
Storing and Bringing It Back to Life
Fridge Storage
Cool the nests completely before refrigerating in an airtight container. The nests can stay fresh for up to 3 days, retaining their flavor and texture. When ready to eat, reheat in a skillet with a splash of olive oil to revive the crispness. The oil helps restore the golden exterior and prevents the sweet potato from drying out. Avoid microwaving, as it can make the eggs rubbery. Proper storage keeps the nests delicious for later.
Freezer Friendly
Freeze the nests in a single layer on a parchment‑lined tray before transferring to a freezer bag. They’ll keep well for up to 2 months, maintaining their flavor. Thaw overnight in the refrigerator, then reheat in a skillet as described above. The nests will reheat evenly, preserving the crisp edges. Adding a splash of water before reheating steams the interior back to perfection. Freezing is a great way to have breakfast ready whenever you need it.
Best Reheating Method
Reheat the nests on a low‑heat skillet, adding a teaspoon of olive oil or a splash of water to keep them moist. Stir gently to redistribute heat and avoid overcooking the eggs. The nests should be heated until the sweet potato is warm and the eggs are set. The skillet’s heat will crisp the exterior while keeping the interior silky. This method ensures the nest feels fresh, not reheated. Enjoy the dish as if it were freshly made.
The moment the first nest lands on your plate, you’ll feel a surge of confidence that you’ve mastered a breakfast that’s both wholesome and indulgent. The aroma of sweet potato and fresh chives will linger, promising more than just a meal—it’s an experience. I’ve had friends come back for seconds, and sometimes even thirds, because the flavor just doesn’t quit. If you’re ready to elevate your mornings, this recipe is your new go‑to. It’s simple, it’s delicious, and it’s guaranteed to impress. Let the nest of flavors become your breakfast staple.
Now that you’ve seen the entire process, from ingredient selection to plating, it’s time to roll up your sleeves and give it a try. Remember the hacks and tips we sprinkled throughout, and you’ll have a nest that looks like a piece of art and tastes like pure bliss. Whether you’re cooking for yourself or for a crowd, this dish will shine. And if you ever want to experiment, the variations we outlined will keep the excitement alive. Your taste buds will thank you, and your friends will be begging for the recipe. So go ahead, turn on that skillet, and let the sweet potato spiral into breakfast greatness.