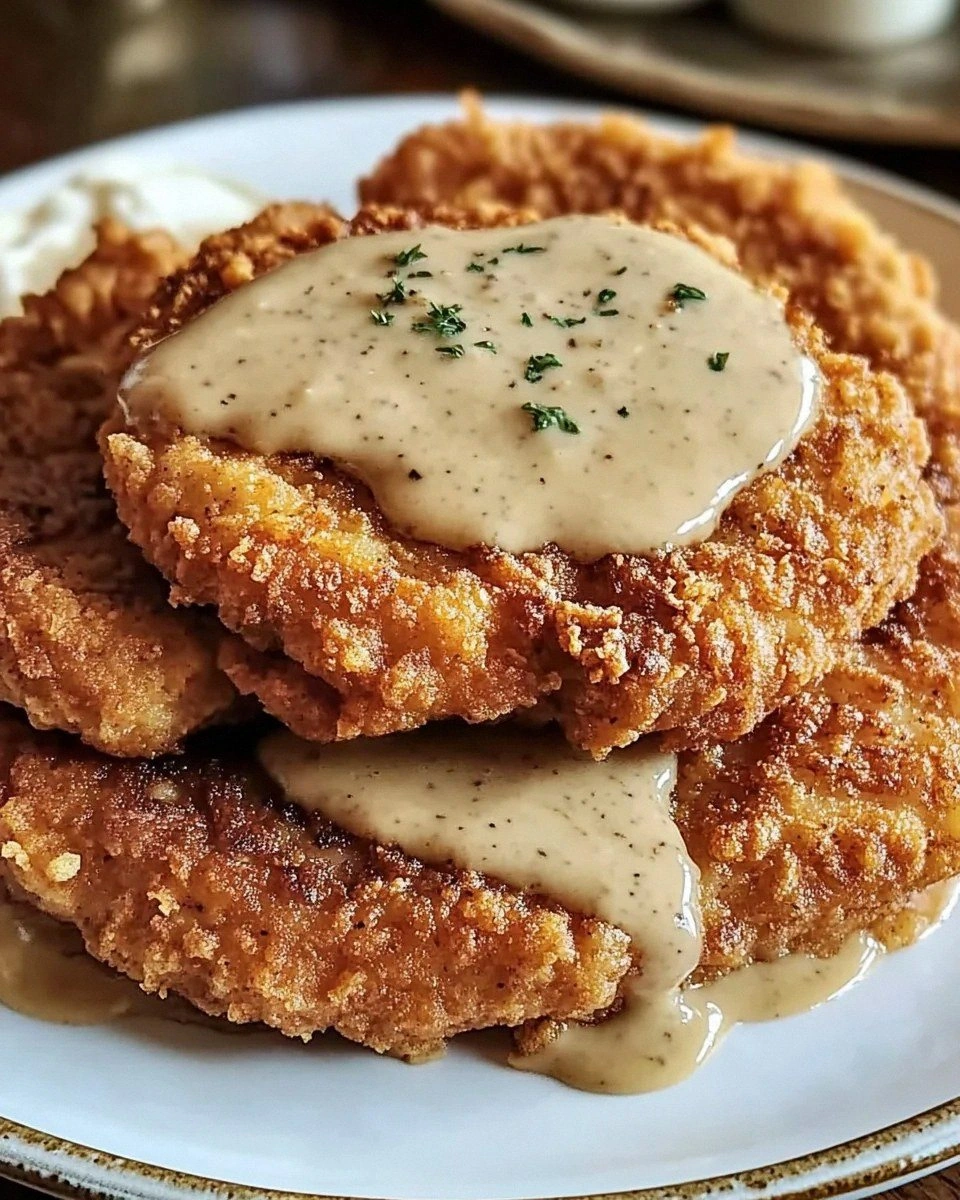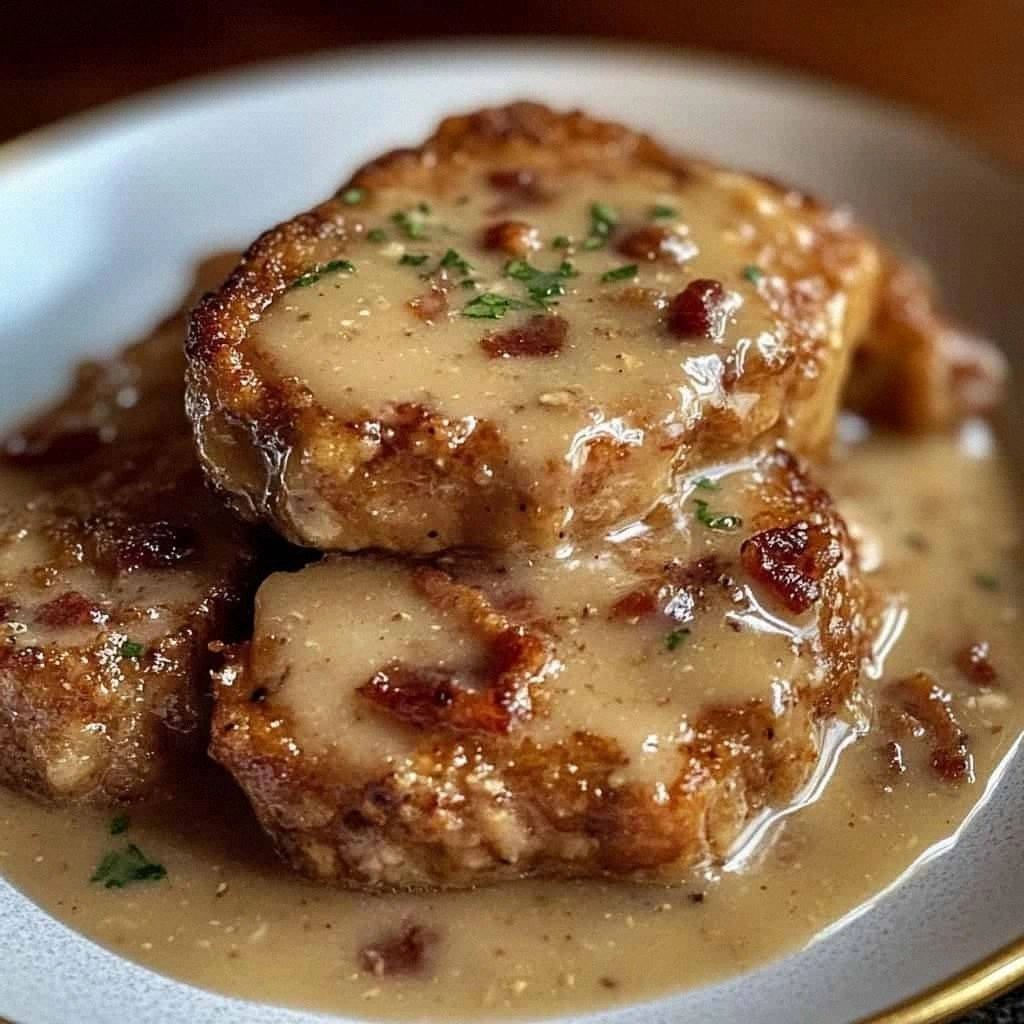
I still remember the first time I attempted country fried pork chops. It was a rainy Sunday, the kind that makes you want to wrap yourself in a blanket and eat something that feels like a warm hug. I followed some random recipe online, and what emerged from my skillet was a sad, soggy mess that tasted like disappointment with a side of regret. The coating slid off like a wet sock, the pork was drier than my humor after three cups of coffee, and my kitchen looked like a flour bomb had exploded. Fast forward through three weeks of obsessive testing, five pounds of pork, and one very patient dog who got to eat the failures — and here we are. This version? This is the one that made my neighbor bang on the wall because the smell was driving her crazy. The one that had my brother-in-law texting me at midnight asking if I had any left. The one that'll ruin you for all other pork chops forever.
Picture this: a golden-brown crust that shatters under your fork like the top of a crème brûlée, revealing pork so juicy it practically sighs when you cut into it. The gravy — oh, the gravy — is a silky, peppery dream that starts with rendered bacon fat because we're not animals, we're artists. This isn't just dinner; it's a time machine that transports you to a Southern kitchen where someone's grandmother is humming while flour dances in the air and the cast iron sizzle is the only music you need. I dare you to taste this and not go back for seconds. Actually, I dare you to not eat half the batch before anyone else gets to try it — because I'll be honest, that's exactly what happened to me last Tuesday.
Most recipes get this completely wrong. They treat the coating like an afterthought, they rush the cooking process, and they absolutely murder the pork until it's tougher than your high school math teacher. Here's what actually works: a double-dredge technique that creates layers of crispy armor, a temperature dance that keeps the pork tender while the crust reaches maximum crunch, and a gravy that's essentially liquid bacon because why would you ever use plain oil when you could use liquid gold? If you've ever struggled with coating that falls off, pork that's pink in the middle and burnt on the outside, or gravy that tastes like wallpaper paste, you're not alone — and I've got the fix.
The secret weapon? Buttermilk that's been lounging with some vinegar for five minutes while you prep everything else. This isn't just about tenderness (though it delivers that in spades); it's about creating a tangy, slightly thick base that makes the flour coating stick like it owes you money. And here's the twist you'll never expect — we're reserving some of that seasoned flour to thicken our gravy, so every bite tastes like the best parts of fried chicken and biscuits got married and had a delicious baby. Picture yourself pulling this out of the oven, the whole kitchen smelling like a Southern diner where calories don't count and happiness is measured in crispy edges. Let me walk you through every single step — by the end, you'll wonder how you ever made it any other way.
What Makes This Version Stand Out
Shatter-Crisp Coating: This isn't your average breadcrumb situation. We're building a three-layer armor system that starts with seasoned flour, gets a buttermilk bath, then dives back into the flour for a second coat. The result? Edges that crack like thin ice under your fork, releasing a puff of steam and revealing the juicy treasure inside. Most recipes stop at one coat — amateurs.
Juicy-Guaranteed Pork: Forget everything you know about cooking pork until it's gray and sad. We're using a temperature technique that would make a scientist proud — starting hot to set the coating, then finishing gentle and low. The result is pork that's blushing just slightly, so tender you could cut it with the side of your spoon. This is hands down the best version you'll ever make at home.
Bacon Fat Gravy Magic: While the pork rests, we're not wasting those precious pan drippings. Nope, we're adding chopped bacon to create a gravy that's essentially liquid breakfast. The flour we reserved from coating gets whisked in, creating a roux that's nutty, rich, and packed with flavor that regular oil could never deliver. Your kitchen will smell like a diner where dreams come true.
One-Pan Wonder: Despite tasting like you spent hours slaving away, this entire masterpiece happens in a single cast iron skillet. Less dishes, more glory. The same pan that fries your pork becomes the vessel for gravy greatness — because we're efficient, not lazy (okay, maybe a little lazy, but in a smart way).
Make-Ahead Friendly: Here's where it gets sneaky-good. You can prep the flour mixture the night before, get your pork bathing in buttermilk while you sleep, and have dinner on the table in twenty minutes flat. Perfect for those "I want to impress people but also want to watch Netflix" kind of evenings.
Leftover Legend: Cold pork chops straight from the fridge the next morning? They're basically meat candy. But if you want to reheat them properly, I've got a technique that brings back that fresh-from-the-pan crunch like it never left. Future you is already thanking present you.
Inside the Ingredient List
The Flavor Base
Pork chops are the star, but they're nothing without their supporting cast. We're using boneless chops about an inch thick — thick enough to stay juicy, thin enough to cook through without burning the coating. Look for ones with a little fat marbling because flavor lives in those white streaks. If all you can find are thin chops, buy double and stack them after pounding — we're problem-solvers here. The buttermilk isn't just for tenderness; it's a tangy flavor bomb that makes the pork taste like it spent a summer vacation in the South, soaking up all the good vibes and coming home with stories to tell.
The Texture Crew
All-purpose flour is our canvas, but we're not using it straight from the bag like some kind of kitchen rookie. We're seasoning it like it owes us money — garlic powder for that savory depth, smoked paprika for mystery and intrigue, salt and pepper because we're not monsters. The flour does double duty: first as coating, later as gravy thickener. That sizzle when it hits the pan? Absolute perfection. The vegetable oil and butter combo is where the magic happens — oil for high-heat crisping, butter for flavor that makes your knees weak. Together they create a frying environment that would make a Southern grandmother nod approvingly.
The Unexpected Star
Bacon isn't just a breakfast food; it's liquid gold waiting to happen. Four slices, chopped fine, render down into crunchy bits swimming in smoky fat that becomes the base of our gravy. This is why people who don't eat bacon can't be trusted — they're missing out on one of life's greatest pleasures. The chicken broth might seem redundant when we have milk, but it's the secret to gravy that tastes like it simmered for hours instead of minutes. It's the difference between flat and dimensional, between okay and "holy cow, what is this sorcery?"
The Final Flourish
Fresh parsley at the end isn't just for color — it's a bright, grassy note that cuts through all the richness like a spotlight on a dark stage. Skip it and the dish still works, but add it and suddenly everything tastes fresher, more intentional, like you actually know what you're doing back there. The milk for the gravy needs to be whole because we're not here to apologize for calories. This is comfort food, not diet food, and anyone who tells you otherwise is living a sad, flavorless life.

The Method — Step by Step
- Start by setting up your breading station like you're preparing for surgery — because in a way, you are. We're performing deliciousness surgery here. Place your flour in a shallow dish and season it like you mean business. I'm talking about really working that garlic powder, smoked paprika, salt, and pepper through every grain until it looks like beach sand that's been partying with spices. Take two tablespoons of this seasoned flour and set it aside for the gravy — this isn't just being organized, it's being brilliant. The buttermilk goes in another dish, and here's where we get a little rebellious: if you don't have buttermilk (because who keeps buttermilk around like it's 1950?), add a teaspoon of vinegar to regular milk and let it sit for five minutes while you question your life choices.
- Now for the pork prep — and this part is crucial, so don't skip ahead to the fun stuff. Pat those chops dry like you're trying to get into their good graces. Moisture is the enemy of crispiness, and we're not here to make friends with soggy coating. Season both sides with salt and let them rest while the buttermilk does its tangy thing. This is the moment of truth where most people rush and wonder why their coating falls off later. We're building layers here, people. Layers of flavor, layers of texture, layers of "how did you make this taste like a restaurant?"
- Okay, ready for the game-changer? The double-dredge technique that separates the amateurs from the legends. Take a pork chop, give it a gentle press into the seasoned flour — both sides, edges too, be thorough. Shake off the excess like you're shaking off bad decisions. Into the buttermilk it goes, let it bathe for a second, then back into the flour for round two. This second coat should look like you're trying to make the pork chop disappear under a flour avalanche. Press the flour on, really work it in there. This is what creates those crispy shards that'll make people close their eyes when they bite into it.
- Heat your cast iron skillet over medium-high heat — and yes, it has to be cast iron because we're not amateurs playing around with stainless steel here. Add the vegetable oil and butter, and wait until the butter stops foaming. This is where your patience gets tested. The oil should shimmer like a mirage in the desert, and a pinch of flour should sizzle immediately when dropped in. Too cool and your coating becomes a greasy sponge. Too hot and congratulations, you've invented charcoal-coated pork. The sweet spot is when the butter just starts to brown — that's your cue that the pan is ready for greatness.
- Gently lay your pork chops in the pan like you're laying a baby down for a nap — carefully, lovingly, with the knowledge that this moment determines everything. Don't crowd the pan; these chops need personal space to achieve their full potential. You should hear an immediate, satisfying sizzle that sounds like applause from a very small, very enthusiastic audience. Let them cook undisturbed for four minutes. I know it's tempting to peek, but resist. The coating is forming its crispy armor, and disturbing it now is like opening the oven door on a soufflé — technically possible but emotionally devastating.
- After four minutes, use tongs to check the underside. It should be golden brown and ready to flip. If it sticks to the pan, it's not ready — patience, young grasshopper. When it releases easily, flip it over and let the other side cook for three to four minutes. This next part? Pure magic. Add the chopped bacon to the spaces between the pork chops. As the bacon renders, it'll create smoky, salty liquid gold that'll become the base of our gravy. The pork is nearly done when it feels firm but still has a little give when pressed — like a well-exercised thigh muscle (stay with me here, the analogy works).
- Remove the pork to a wire rack set over a baking sheet. This isn't just for show — the air circulation keeps the bottom from getting soggy while we work our gravy magic. Tent loosely with foil but don't wrap it up like a burrito — steam is the enemy of crispiness, and we didn't come this far to let condensation ruin our masterpiece. The pork will continue cooking slightly from residual heat, reaching that perfect just-blushing stage that makes food safety people nervous and flavor enthusiasts ecstatic.
- Now for the fun part — and stay with me here because this is worth it. You should have rendered bacon bits and about two tablespoons of fat in the pan. If you're short on fat, add a little butter. If you've got too much, pour some off — we're making gravy, not swimming in grease. Sprinkle in that reserved seasoned flour and whisk like your life depends on it. The roux should look like wet sand at first, then transform into a smooth, bubbling paste. Cook for one minute to get rid of that raw flour taste — your nose will tell you when it's ready because it'll start smelling like toasted nuts and promises.
- Slowly pour in the chicken broth while whisking constantly — this is where people panic and end up with lumpy gravy, but not you. You're going to pour in a steady stream while your other hand works that whisk like you're conducting an orchestra. Once the broth is incorporated and smooth, add the milk in the same patient manner. The gravy will thicken quickly, so don't walk away. Season with salt and plenty of black pepper — be generous, this is country gravy, not diet food. Let it simmer for two minutes until it coats the back of a spoon like velvet.
- Slice your pork chops against the grain, revealing the juicy interior and crispy coating in all their glory. Drizzle with the bacon gravy, sprinkle with fresh parsley if you're feeling fancy, and prepare for the standing ovation. That's it — you did it. But hold on, I've got a few more tricks that'll take this to another level...
Insider Tricks for Flawless Results
The Temperature Rule Nobody Follows
Here's the thing that'll change your pork chop game forever: use a thermometer. I know, I know — you want to be one of those intuitive cooks who can tell doneness by poking meat with their finger. But unless you've poked thousands of pork chops (which sounds weird now that I say it out loud), you need backup. Pull those chops when they hit 145°F in the thickest part. They'll rise to 150°F while resting, giving you perfectly juicy meat that's safe to eat but doesn't taste like cardboard. A friend tried skipping this step once — let's just say it didn't end well, and we don't talk about "the great pork disaster of 2022" anymore.
Why Your Nose Knows Best
Your sense of smell is the most underused tool in your kitchen arsenal. When the flour in your roux starts smelling like toasted hazelnuts and butter, you know you're golden — literally and figuratively. When the bacon hits the pan and fills your kitchen with that smoky, salty perfume, that's your cue that magic is happening. Trust your nose over the clock every single time. If something smells like it's burning, it probably is. If something smells like heaven, you're on the right track. This isn't just cooking; it's aromatherapy with benefits.
The 5-Minute Rest That Changes Everything
I get it — you've got hungry people circling like vultures, the smell is driving everyone crazy, and you want to dive in immediately. Resist! Those five minutes of resting time aren't just for show. They're when the juices redistribute throughout the meat instead of flooding your cutting board. They're when the coating sets up and becomes even crispier. They're when you can finish your gravy without worrying about cold pork. Cover loosely with foil, pour yourself a glass of sweet tea, and practice the ancient art of patience. Your future self will thank you when you're not chewing on dry, disappointed pork.
Creative Twists and Variations
This recipe is a playground. Here are some of my favorite ways to switch things up:
Spicy Southern Heat
Add a teaspoon of cayenne to your flour mixture and swap the smoked paprika for chipotle powder. The result is pork chops with a kick that sneaks up on you like a plot twist in a good book. Serve with cooling coleslaw and prepare for people to fan their mouths while reaching for seconds. The gravy gets a dash of hot sauce too — because we're consistent in our chaos.
Honey Butter Glaze
Skip the gravy and instead melt two tablespoons of butter with two tablespoons of honey and a splash of hot sauce. Brush this over the pork chops right after they come out of the pan. The sweet-spicy-sticky glaze creates a candied coating that's completely addictive. It's like fair food but classy, if that makes sense. Pro tip: make extra for dipping — you'll thank me when you're licking your fingers like some kind of honey-buttered barbarian.
Herb Garden Edition
Mix fresh chopped thyme, rosemary, and sage into your flour mixture. The herbs fry up into crispy, fragrant bits that make your kitchen smell like a Provencal market. Use the same herbs in your gravy, but add them at the very end so they stay bright and green. This version tastes like you know what you're doing with your life, even if your laundry's been sitting in the dryer for three days.
Breakfast of Champions
Top your pork chops with a fried egg and serve them alongside crispy hash browns. The runny yolk mixes with the gravy to create a sauce that's basically liquid breakfast heaven. Add a side of grits and you've got a meal that could stop wars or at least make people forget what they were arguing about. I've served this at brunch and watched grown adults cry — tears of joy, but still.
Mushroom Hunter's Version
Add sautéed mushrooms to your gravy along with a splash of sherry. The earthiness of the mushrooms plays beautifully with the smoky bacon, creating a gravy that's so good you'll want to put it on everything — ice cream, your problems, the neighbor's cat. This version feels fancy enough for company but comforting enough for a Tuesday when you need a hug in food form.
Tex-Mex Mashup
Season your flour with cumin, oregano, and chili powder. Serve the pork chops with queso instead of gravy, add pickled jalapeños on top, and suddenly you've got a fusion dish that shouldn't work but absolutely does. It's like your pork chops went on vacation to Austin and came back with stories and a new outlook on life. The crispy coating with melty queso is a texture combination that'll make you question everything you thought you knew about food.
Storing and Bringing It Back to Life
Fridge Storage
Store leftover pork chops in an airtight container with a paper towel underneath to absorb excess moisture. They'll keep for up to four days, though honestly, they've never lasted more than two days in my house because midnight snacking is real and I'm not ashamed. Keep the gravy in a separate container — it'll thicken into a spoonable consistency that's perfect for spreading on toast the next morning. Don't judge until you've tried pork chop gravy on sourdough toast; it's basically breakfast pâté.
Freezer Friendly
You can freeze the cooked pork chops for up to two months, but here's the trick: freeze them uncovered on a baking sheet first, then transfer to a freezer bag once they're solid. This prevents them from sticking together in one giant pork mass that requires a chisel to separate. The gravy freezes beautifully in ice cube trays — pop out a cube or two when you need a quick sauce for chicken, vegetables, or your existential crisis. Thaw everything overnight in the fridge for best results.
Best Reheating Method
Forget the microwave — that's how you end up with rubbery meat and soggy coating. Instead, place the pork chops on a wire rack over a baking sheet and warm them in a 350°F oven for about 10 minutes. Add a tiny splash of water to the pan before reheating — it steams back to perfection while keeping the coating crisp. The gravy gets a gentle reheat in a small pan with a splash of milk to bring it back to its silky glory. If you're really in a hurry, the air fryer works wonders — three minutes at 350°F and it's like they were just cooked.