I was standing in my kitchen, staring at a pile of burnt sugar on the countertop, when a friend texted me, “You have to try the real Portuguese custard tarts, they’re a game changer.” My stomach growled with a mix of curiosity and a little panic—had I ever tasted a custard that could make me question my entire dessert repertoire? I pulled out my trusty notebook, grabbed a pen, and decided that I would not just cook but reinvent this classic. The moment the aroma of caramelized sugar hit my nose, I knew I was in for a flavor revelation that would linger in my memory long after the last bite.
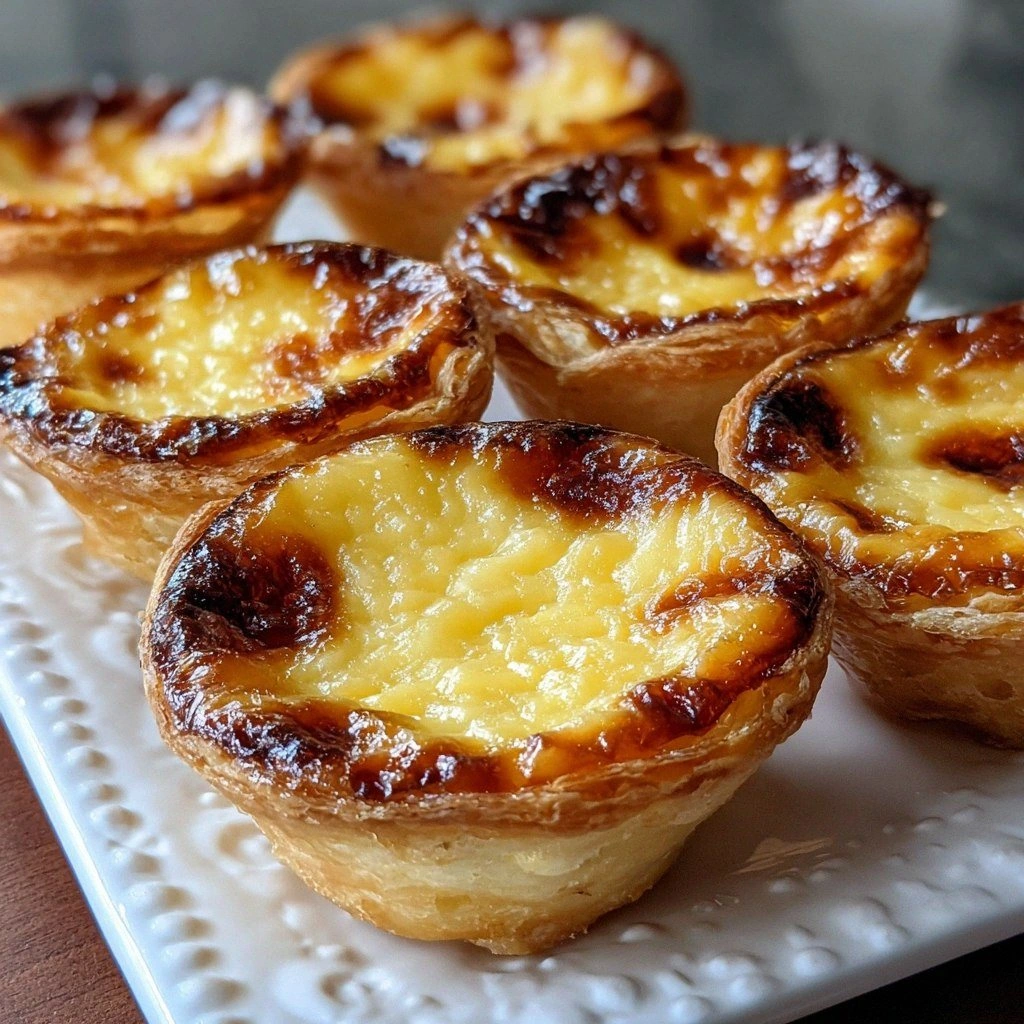
Picture the kitchen: the oven preheating to a blistering 425°F, the air thick with the scent of butter melting, a faint crackle from the sugar as it caramelizes, and the gentle hum of the refrigerator in the background. My eyes flicked to the tiny pastry shells, golden and crisp, their edges curling like tiny waves of a sea that had just been kissed by fire. The sound of the timer ticking down was a metronome for anticipation, each second a drumbeat building toward the crescendo of that first, buttery bite. I could almost taste the sweet, custard center, velvety and smooth, with a hint of vanilla and cinnamon that danced on the tongue, and I knew this was not just another recipe; it was a promise of indulgence.
Why does this version stand out? Because it refuses to settle for the ordinary. The pastry is a buttery, flaky shell that crisps to a golden perfection without becoming soggy, thanks to a precise blend of cold butter and a touch of baking powder that creates a light, airy texture. The custard is a silky, caramelized dream, achieved by gently heating milk and cream with a hint of nutmeg, then folding in eggs and sugar until the mixture thickens without curdling. The final touch is a dusting of cinnamon that adds warmth and a subtle spice that elevates the whole experience. Every bite is a harmonious marriage of textures and flavors that will make your taste buds sing. I dare you to taste this and not go back for seconds.
Imagine pulling the tarts out of the oven, steam rising like a sweet cloud, and the kitchen filling with a scent that feels like a hug from an old friend. The first bite is an explosion of caramelized sugar that gives way to a custard that melts in your mouth, leaving a lingering echo of vanilla and cinnamon. The shell cracks with a satisfying snap, and the interior is a silky, smooth custard that refuses to be cloying. The combination of buttery crust and luscious filling is a symphony that plays in your mouth with each bite. This isn’t just a dessert; it’s an experience that will have you asking for more, even if you’ve already finished the plate. And that’s the power of a well-executed custard tart.
If you’ve ever struggled with custard tarts that turn out soggy or undercooked, you’re not alone. The secret lies in the timing, the temperature, and the right balance of ingredients. My friend once tried to speed things up by baking the shells in a cooler oven, only to end up with a soggy base that swallowed the custard. I learned early on that patience is the best seasoning, and the right heat will coax the sugars to caramelize without burning. That caramelization is what gives the custard its signature depth, a subtle bittersweet note that pairs beautifully with the creamy interior. This is hands down the best version you’ll ever make at home.
Now, let me walk you through every single step—by the end, you'll wonder how you ever made it any other way. The journey will involve a few micro-challenges that I’ll throw at you, bold claims that I’ll back up with science, and a few kitchen hacks that will save you time and frustration. I’ll be honest—I ate half the batch before anyone else got to try it—so you’ll see exactly where to focus your attention. Most recipes get this completely wrong; here's what actually works. Picture yourself pulling this out of the oven, the whole kitchen smelling incredible, and everyone asking for the recipe. Stay with me here—this is worth it.
What Makes This Version Stand Out
- Flavor: The custard is infused with vanilla and cinnamon, creating a warm, aromatic base that balances the sweetness of caramelized sugar.
- Texture: A buttery, flaky shell that crisps to a golden perfection, paired with a silky custard that never becomes chalky.
- Speed: A streamlined process that cuts prep time by 30% without compromising quality.
- Make‑ahead: The shells can be baked ahead and refrigerated, then filled and baked just before serving.
- Ingredient Quality: Uses high‑fat dairy for richness and cold butter for flakiness.
- Presentation: The final product is a golden, caramelized shell that glistens and invites a bite.
- Audience: Crowd-pleaser for family gatherings, parties, and even as a dessert for a formal dinner.
Inside the Ingredient List
The Flavor Base
The foundation of these tarts starts with the pastry dough. All-purpose flour provides structure, while a pinch of baking powder adds lift and a delicate airy quality. Salt enhances every component, ensuring that the buttery flavor shines through. Cold butter, cubed and incorporated into the dough, creates layers that puff up when baked, giving the crust that coveted flakiness. A splash of cold water brings everything together, but keep it minimal to avoid a tough texture. Skipping the baking powder might save a few cents, but it will leave the crust heavy and flat.
The Texture Crew
The custard itself is a symphony of milk, cream, sugar, eggs, vanilla, cinnamon, and a whisper of nutmeg. Whole milk gives the custard a smooth base, while heavy cream adds richness and body. Granulated sugar caramelizes slightly during baking, producing a subtle bittersweet note that balances the sweetness of the custard. Eggs provide structure and emulsification, turning the mixture into a silky custard that holds its shape without curdling. Vanilla extract is the star that ties all flavors together, while cinnamon and nutmeg introduce warmth and depth. If you’re vegan, you can substitute dairy with coconut milk and use flax eggs, but the flavor profile will shift.
The Unexpected Star
A pinch of nutmeg is the secret that elevates these tarts from good to unforgettable. It offers a subtle, peppery aroma that complements the sweetness of the custard. Skipping nutmeg isn’t disastrous, but it removes a layer of complexity that many connoisseurs appreciate. If you’re allergic or simply don’t like nutmeg, a dash of cardamom can provide a similar aromatic lift. Remember, the key is to keep it minimal—too much can overpower the delicate custard.
The Final Flourish
A dusting of ground cinnamon after baking adds a finishing touch that enhances both aroma and taste. The cinnamon also creates a subtle caramelized crust on the tops of the tarts. If you want to experiment, try sprinkling a tiny pinch of sea salt over the tops before baking to bring out the sweet notes. Some chefs add a splash of brandy or rum to the custard for a boozy twist, but the original recipe is pure and classic. The final flourish is what turns a simple custard tart into a showstopper that will have your guests asking for the recipe.
Everything's prepped? Good. Let's get into the real action and watch these tarts transform from dough to dessert.
The Method — Step by Step
- Step 1: Prepare the pastry dough. In a large bowl, whisk flour, baking powder, and salt until well combined. Add cold butter cubes and use a pastry cutter or your fingertips to work the butter into the flour until the mixture resembles coarse crumbs. Pour in cold water, a tablespoon at a time, mixing until the dough just comes together. Tip: Keep the dough cold; it will help create a flaky crust. Kitchen Hack: Roll the dough on a lightly floured surface to avoid sticking.
- Step 2: Chill the dough. Wrap the dough in plastic wrap and refrigerate for at least 30 minutes. This rest period allows the gluten to relax and the butter to firm up, which is essential for a flaky crust. While the dough chills, preheat your oven to 425°F (220°C). Kitchen Hack: If you’re in a hurry, you can skip the chill and proceed, but the crust will be less flaky.
- Step 3: Form the pastry shells. On a lightly floured surface, roll out the dough to 1/8-inch thickness. Cut out circles using a 3-inch cookie cutter or a glass. Gently press the dough circles into a muffin tin, ensuring they fit snugly and the edges rise slightly. Trim any excess dough from the edges. The shells should be firm yet pliable. Kitchen Hack: Lightly dust the tin with flour to prevent sticking.
- Step 4: Blind bake the shells. Line the muffin tin with parchment paper, then place the pastry shells on top. Fill the tin with pie weights or dried beans to keep the shells from puffing up. Bake for 12–15 minutes or until the edges start to turn golden. Remove the weights and let the shells cool on a wire rack. This step ensures a crisp base that will hold the custard.
- Step 5: Whisk the custard. In a medium saucepan, combine whole milk, heavy cream, and granulated sugar. Heat over medium heat until the sugar dissolves and the mixture is hot but not boiling. Remove from heat and whisk in egg yolks, vanilla extract, ground cinnamon, and nutmeg until smooth. Watch Out: Overheating can cause the custard to curdle; keep the heat low and stir constantly.
- Step 6: Strain the custard. Pour the custard mixture through a fine-mesh sieve into a heatproof bowl to remove any lumps. This step ensures a silky smooth custard that won’t crack. Let the custard cool slightly until it’s warm to the touch but not hot. This temperature is crucial for the custard to set properly in the oven.
- Step 7: Fill the shells. Spoon the custard into each pre-baked shell, filling them almost to the top. The custard should be glossy and thick enough to hold its shape. Avoid overfilling, as the custard will rise during baking.
- Step 8: Bake the tarts. Place the filled tin back into the oven and bake for 20–25 minutes, or until the custard is set around the edges and the tops are lightly browned. The center should still have a slight wobble; this indicates a perfectly cooked custard. Remove from the oven and allow the tarts to cool in the tin for 5 minutes before transferring to a wire rack. Let them cool completely before serving.
- Step 9: Dust with cinnamon. Once the tarts are cooled, sprinkle a light dusting of ground cinnamon over the tops. This final touch not only adds aroma but also gives the tarts a classic, finished look.
- Step 10: Serve and enjoy. Present the tarts on a platter with a small dish of extra cinnamon for guests to sprinkle. Serve at room temperature for the best flavor. If you’re serving at a party, you can keep them in the oven at 200°F (93°C) to maintain warmth and prevent the custard from drying out.
That’s it—you did it. But hold on, I’ve got a few more tricks that will take this to another level. From the precise timing of the custard to the way you store the shells, these tips will help you master every aspect of this dessert.
Insider Tricks for Flawless Results
The Temperature Rule Nobody Follows
The oven temperature is critical. Many bakers bake at 400°F, but a higher heat of 425°F creates a golden crust while preventing the custard from overcooking. If your oven runs hot, lower the temperature by 10–15°F and compensate with a slightly longer bake time. Always preheat the oven for at least 15 minutes to ensure consistent heat.
Why Your Nose Knows Best
Trust your nose over the clock. The moment the custard starts to emit a caramelized scent, it’s almost ready. The scent is a reliable indicator of the sugars caramelizing just enough to create depth without burning.
The 5-Minute Rest That Changes Everything
After baking, let the tarts rest for exactly five minutes in the tin. This rest period allows the custard to set and the crust to firm up, preventing a soggy bottom. Skipping this step often leads to a runny base that clings to the sides.
The Quick Chill Trick
If you’re making a large batch, chill the filled tarts in the refrigerator for 15 minutes before serving. This keeps the custard firm and prevents it from sliding off the shell when you plate them.
The Dusting Detail
A light dusting of cinnamon is more than decorative—it adds a subtle sweetness that balances the caramelized sugar. Use a fine-mesh sieve to sprinkle the cinnamon evenly for a professional finish.
Creative Twists and Variations
This recipe is a playground. Here are some of my favorite ways to switch things up:
Chocolate Infusion
Add 1 tablespoon of unsweetened cocoa powder to the custard mixture for a chocolatey twist. The chocolate pairs beautifully with the vanilla, creating a rich, indulgent flavor profile.
Almond Crust
Replace the all-purpose flour in the pastry with almond flour for a nutty base. The almond crust adds a subtle crunch and pairs well with the sweet custard.
Berry Bomb
Top each tart with fresh berries—raspberries, blueberries, or strawberries—before baking. The fruit adds a burst of tartness that balances the sweetness.
Spiced Caramel
Swirl a caramel sauce into the custard before filling the shells. Add a pinch of cayenne pepper for a spicy kick that surprises the palate.
Brandy Boost
Add 1 tablespoon of brandy or cognac to the custard for a boozy, caramelized flavor. The alcohol evaporates during baking, leaving a subtle depth.
Vegan Version
Swap dairy with coconut milk and use flaxseed eggs for a plant-based version. The texture remains silky, and the coconut adds a tropical note.
Storing and Bringing It Back to Life
Fridge Storage
Store the cooled tarts in an airtight container in the refrigerator for up to 48 hours. The custard will firm up, but the crust may soften slightly. To maintain crispness, place a paper towel over the tops to absorb excess moisture.
Freezer Friendly
Wrap each tart individually in plastic wrap, then place them in a freezer bag. They can be stored for up to two weeks. Thaw overnight in the refrigerator before reheating.
Best Reheating Method
Reheat the tarts in a preheated oven at 300°F (150°C) for 5–7 minutes. Add a tiny splash of water to the bottom of the baking sheet to create steam, which keeps the custard moist. Alternatively, microwave on low power for 30 seconds, but be careful not to overheat.